For more than half a century, Lincoln Wood Products has been dedicated to the production of quality windows and patio doors. Our products are designed and crafted not only for beauty, but also for energy efficiency, smooth operation and low maintenance.
Most window and patio door problems encountered by homeowners are avoidable. Simple measures such as properly cleaning the glass and screens, lubricating locks and hinges and finish maintenance will help ensure many years of service from your windows and patio doors. With a little care and consideration, your Lincoln windows and patio doors can look and operate like new for years to come.
Your Lincoln products come with a comprehensive warranty, which is attached to each label on the product.
Operating Panel Adjustment
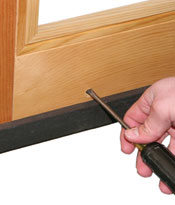
If your slide patio door panel does not operate smoothly it can be adjusted via the two adjustment screws located at the bottom inside face of the operating panel.
To adjust the door, remove the plugs covering the adjustment screws. Using a Phillips screwdriver adjust the operating panel up or down being sure to keep the panel square with the lock side jamb. Turning the adjustment screws clockwise will lower the door panel while turning the screw counter clockwise will raise the panel. Be sure to replace the plug covers after the adjustments are completed. This will help to keep the rollers clean. After your door is adjusted, latch and keeper adjustment may be necessary.
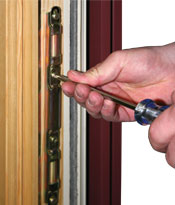
Lock and Keeper Adjustment
To make sure that your patio door closes correctly, the keeper may be adjusted up or down until the latch engages properly. It is also possible to tighten or loosen the latch mechanism on the door by using the adjustment screw on the edge of the latch.
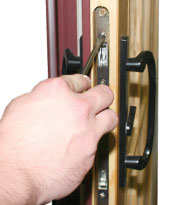
Screen Adjustment
If your rolling patio screen does not operate smoothly, it may be adjusted via the two adjustment screws located at the bottom vertical screen frame edge. Use a small Phillips screwdriver to adjust the bottom rollers up or down until the screen rolls smoothly. Make sure to keep the screen square to the lock side jamb.
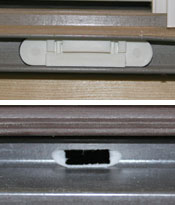
Track Maintenance
It is important that the sill track be kept free of dirt and debris. To clean, vacuum loose dirt and debris as necessary. Wash tracks with mild soap and water as needed. There are weep holes on the exterior edge of the sill and at both jamb edges viewed from the interior. They must be kept free of dirt and debris.
...
Hinge Adjustment
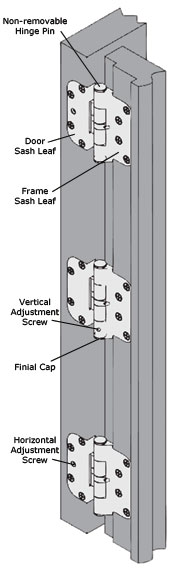
Lincoln swing patio doors are equipped with SET hinges and GUIDE hinges that can be adjusted to square the operating panel within the frame. Set hinges allow for 1/8” vertical adjustment-hex head screw is located under the hinge pin finial cap. The guide hinge provides 1/8” of horizontal adjustment and has a visible hex head adjustment screw on the leaf face. Prior to adjusting, determine that the frame is plumb, square and level in the rough opening. If discrepancies are found, take corrective action on the frame prior to adjusting hinges.
These instructions denote a right-hinged door viewed from the inside. If door is left hinged, simply reverse the procedures. Maintain approximately 1/8” of clearance at the head jamb. After adjusting be sure and check the latch operation.
Required tools:
- 3/16” hex wrench
- Flat head screwdriver
- Plastic putty knife
 Video Demonstration
Squaring the Door Within the Frame
6/6, 6/8 and 7/0 height doors are equipped with three hinges; 8/0 & 9/0 high doors have four hinges. The top hinge moves the upper part of the door, the center hinge(s), will adjust the panel vertically and the bottom hinge will move the base of the door. When adjusting, hinges should be manipulated to ensure approximately 3/32” clearance on the hinge side.
- To pull the door closer to the hinges, turn the horizontal adjustment screws counter clockwise.
- To push the door closer to the latch jamb, turn the horizontal adjustment screws clockwise.
Operating Panel Adjustments
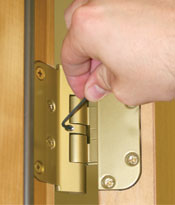
Vertical Adjustments
- Remove the press-fit finial cap from the bottom of the set hinge to expose the adjustment screw. Use a small screw driver for plastic finial caps and the putty knife for brass caps.
- Insert the hex wrench in the bottom of the set hinge. Tighten the screw to raise the panel and loosen to lower the panel.
- Reinstall the finial cap removed in step 1.
- For doors with two set hinges, establish desired height with the top-most set hinge. Adjust other set hinge as follows: turn adjustment screw 1/8 turn past the onset of resistance to distribute the panel weight evenly.
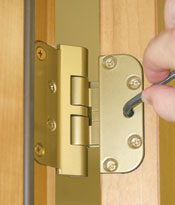
Horizontal Adjustments
- Insert a 3/16” hex wrench into the horizontal adjustment screw.
- Turn clockwise to decrease the margin and counterclockwise to increase the margin on the hinge side.
Sill Maintenance
It is important that the sill be kept free of dirt and debris. To clean the sill, vacuum when necessary. Wash sill with mild soap and water if needed. Always be sure that weep holes on the inside and the outside of the sill are free of dirt and debris. If necessary the retention chamber of the passive weep system can be blown out with compressed air.
...
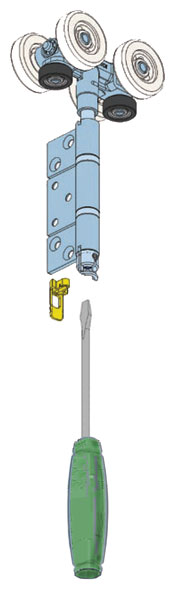
Carrier Pin Adjustment
Components come with a plastic shipping clip installed.
- Insert a flat-bladed screwdriver into the slot and rotate the pin.
- When correct adjustment is reached, remove the shipping clip.
- Carrier pin will snap into place when the blade and slot are aligned.
- To readjust, pull the blade down to disengage it from the slot, replace the shipping clip and rotate the pin.
- Remove shipping clip after final adjustment.
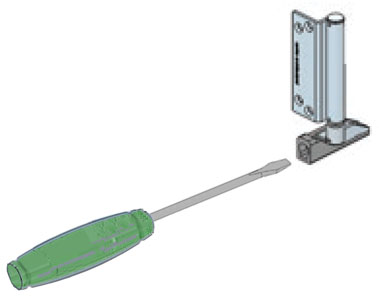
Wall Pivot Adjustment
- Locate screwdriver slot.
- Insert flat-bladed screwdriver into slot and rotate.
- Utilize both top and bottom wall pivots to maximize adjustment range.
Track Maintenance
It is important that the sill track be kept free of dirt and debris. To clean the sill, vacuum when necessary. Wash tracks with mild soap and water if needed. Always be sure that weep holes on the inside and the outside of the sill are free of dirt and debris. If necessary the retention chamber of the passive weep system can be blown out with compressed air.
...